Recipes

Recipes
"Time you enjoy wasting is not wasted time." Marthe Troly-Curtin

Monday, December 25, 2017

TURKEY AND DUMPLINGS

TURKEY AND DUMPLINGS


1 3/4 cups King Arthur Unbleached All-Purpose Flour
1/2 teaspoon baking powder
1/4 teaspoon baking soda
1/2 teaspoon salt
1/4 cup (1/2 stick) butter
1/4 cup chopped fresh herbs (chives, parsley), or 2 tablespoons dried (optional)
3/4 cup buttermilk
1 large egg


POT PIE FILLING
1/4 cup (1/2 stick) butter
1/2 cup King Arthur Unbleached All-Purpose Flour
3 cups turkey stock, or a combination of stock and leftover gravy
1 teaspoon dry thyme
1 bay leaf
salt and pepper to taste
1/4 teaspoon Worcestershire sauce
4 cups diced cooked turkey or chicken
2 1/2 cups frozen mixed vegetables\


Instructions
To make the dumplings: Whisk together the flour, baking soda, baking powder, and salt. Cut in the butter until the mixture resembles coarse bread crumbs. Stir in the herbs, if using. Cover and refrigerate this mixture while you're making the pot pie filling.
To make the filling: Melt the butter in a 3-quart saucepan over medium heat. Whisk in the flour and cook for 1 minute.
Add the stock 1/2 cup at a time, whisking it into the roux to prevent lumps. When all the stock and/or gravy is added, season with the thyme, bay leaf, salt, pepper and Worcestershire sauce. Simmer the sauce for 15 minutes, then stir in the meat and vegetables.
Return the filling to a simmer, and transfer to a 4-quart baking dish with a lid. Preheat the oven to 350°F.
To assemble: Once the hot filling is in the dish, whisk the buttermilk and egg together, and add, all at once, to the dry mixture.
Stir together until evenly moistened.
Scoop the batter on top of the simmering liquid, leaving space between the dumplings (they'll almost double as they cook). Make dumplings large or small, according to your own preference; we like to top the filling with about 8 to 10 dumplings. Put the lid on top, and bake at 350°F for 25 to 30 minutes.


TIPS FROM OUR BAKERS
If you don't have buttermilk on hand for the dumplings, you could thin 1/2 cup sour cream with 1/4 cup milk. Plain yogurt would also work as a substitute.
You can make the pot pie filling in advance, as well as the dumpling recipe (stop before adding the buttermilk and egg). When you're ready to cook, preheat the oven while you bring the filling to a simmer. Mix the buttermilk and egg into the dumpling mix, scoop, and bake.
This is a good recipe for using odds and ends of vegetables, if you have them: gather any stray mushrooms, onions, carrots and leeks you have in the refrigerator, and saute them until tender before adding them to the sauce.
The steam from the sauce helps to keep the dumplings tender, so try not to peek at them while they're cooking, at least for the first 20 minutes. Your patience will be rewarded with lighter, fluffier dumplings.
Don't mix the dry dumpling mix with the wet ingredients until you're ready to put the casserole in the oven. If you let the mixture sit too long before baking it, its baking powder will lose some of its rise while waiting.
Friday, December 8, 2017

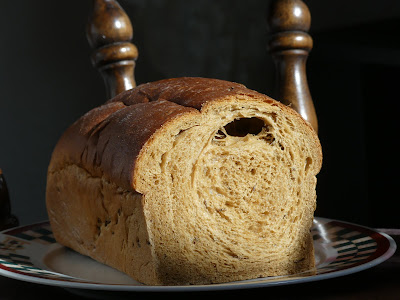
Light Rye Bread


Ingredients

2 packages regular active dry yeast
1/4 cup warm water (105°F to 115°F)
1/2 cup molasses
1/4 cup butter or margarine, softened
3 teaspoons salt
2 1/2 cups very warm water (120°F to 130°F)  (use half milk and half water)
1 tablespoon dark brown sugar
1 heaping tablespoon dry milk powder
5-1/2 cups Bread Flour
1 cups Rye Flour (I used Dark Rye flour)
2 tablespoons Caraway Seeds  (Optional)
Steps
1  In large bowl, dissolve yeast in 1/4 cup warm water. Heat milk/water mixture to steaming, add molasses, butter, salt, brown sugar and 3 cups of the bread flour. Beat with electric mixer on low speed 1 minute, scraping bowl frequently. Beat on medium speed 2 minutes, scraping bowl frequently. Beat in remaining 1 1/2 cups bread flour.
2  With spoon, stir in 1 cup of the rye flour until dough pulls cleanly away from side of bowl.  I use my stand mixer with bread hook.
3  On lightly floured surface, knead in remaining 1/2 to 1 cup bread  flour (or 1/2 bread flour and 1/2 rye flour) add caraway seeds; continue kneading 5 to 10 minutes or until dough is smooth and springy. Grease large bowl with shortening or cooking spray; place dough in bowl, turning dough to grease all sides. Cover; let rise in warm place 30 to 45 minutes or until doubled in size.
4  Generously grease 2 (8x4- or 9x5-inch) loaf pans with shortening or cooking spray. Gently push fist into dough to deflate; divide in half. Shape dough into loaves; place in pans. Cover; let rise in warm place 30 to 45 minutes or until doubled in size.
5  Heat oven to 375°F. Uncover dough; bake 30 minutes. Reduce oven temperature to 350°F; bake 10 to 15 minutes longer or until loaves sound hollow when lightly tapped. Immediately remove from pans to cooling racks. Cool completely, about 1 hour.  (Instant read thermometer 190 to 200 degrees)


Monday, November 6, 2017

Angel Biscuits


 I found this recipe the other day on the Betty Crocker site.  Thought I'd give it a try.  The other recipe that I have seen on so many of the other blogs are for the larger amount (24) biscuits, we just don't need that many at one time.

All the reviews that I have read on the Angel's Biscuits are true!!!  So light and soft...My dough needed a little more flour to hold the biscuit shape.  Nest time.... yes there will be a next time!


Do you have some time to spare? Surprise your family by baking a batch of these homemade biscuits!


Ingredients
1 package regular or quick active dry yeast (2 1/4 teaspoons)
2 tablespoons warm water (105° to 115°)
2 1/2 cups Gold Medal™ all-purpose flour
3 tablespoons sugar
1 1/2 teaspoons baking powder
1/2 teaspoon baking soda
1/2 teaspoon salt
1/2 cup shortening  (I used 1/4 c shortening and 1/4 c butter)
About 1 cup buttermilk

Butter or margarine at room temperature, if desired

Steps
1 Heat oven to 400°. Dissolve yeast in warm water; set aside.
2 Mix flour, sugar, baking powder, baking soda and salt in large bowl. Cut in shortening, using pastry blender or crisscrossing 2 knives, until mixture looks like fine crumbs. Stir in yeast mixture and just enough buttermilk so dough leaves side of bowl and forms a ball.
3 Place dough on generously floured surface; gently roll in flour to coat. Knead lightly 25 to 30 times, sprinkling with flour if dough is too sticky. Roll or pat 1/2 inch thick. Cut with floured 2 1/2-inch biscuit cutter. Place about 1 inch apart on ungreased cookie sheet.
4 Bake 12 to 14 minutes or until golden brown. Immediately remove from cookie sheet. Brush with butter. Serve hot.

I did let the dough rest and rise for about 40 minutes.  You can let them rise up to 1-1/2 hours.


Sunday, September 3, 2017

Beer Can Basil Lime Chicken

We love what this marinade does for grilled chicken...this is the third time posting chicken using it.  I have to brag a little...it's just so darn pretty!!  Not sure why we waited so long to try this method of grilling chicken.  It will happen again.


This is a rather large bird, 6 pounds.  I injected the chicken with the marinade, placed in re sealable plastic bag and poured the reminding marinade.  Put in the refrigerator for about 4 hours to let the flavors set in.


You can kind of see the green marinade under the skin.


We are ready to start the hickory smoking.

Smoking is done... what a juicy thing of beauty!!


Sunday, August 27, 2017

Smoked Pork Butt by Kyle

Smoked Pork Butt by Kyle


Ingredients

Marinade:
2 cups cider vinegar
1 cup corn oil
1 can pineapple concentrate
1/4 cup salt (non-iodized)
1/8 cup paprika
1/8 cup Worcestershire sauce
1/8 cup white pepper
1 chicken bouillon cube (dissolved in 2 tablespoons water)


Rub:
3/4 cup sugar
1/2 cup salt (non-iodized)
1/3 cup black pepper
1/4 cup paprika
1 tablespoon garlic powder
1 tablespoon onion powder
1 tablespoon chili powder
1 tablespoon celery salt
1 tablespoon hickory salt
1 tablespoon msg, optional
1 teaspoon ground cumin
1 teaspoon ground sage
1/4 teaspoon cayenne pepper


Glue:
2 tablespoons yellow mustard
1 tablespoon honey


1 pork butt (approximately 5 pounds)
Apple and hickory wood chips, soaked in water for at least 30 minutes, for smoking
Charcoal, for smoker


Directions


Marinade:

Place all ingredients in a non-reactive bowl and whisk together.

Rub: Place all ingredients in a container with a lid and shake well.

Glue: Whisk ingredients together and place in a squeeze bottle.

Pork: Reserve 1 cup of marinade and set aside. (The reserved marinade will be used to base the pork during the cooking process.) Inject a little marinade into the pork butt in numerous places. Place pork in a resealable plastic bag and cover with remaining marinade. Marinate in the refrigerator for 6 to 8 hours.


Remove the pork from the marinade and pat dry with paper towels.

Cover pork with a light coat of the "glue" mixture to help the rub stick. Sprinkle generously with rub, making sure to work it into the meat.


Prepare a smoker to 225 to 250 degrees F and add the apple and hickory wood chips to the lit charcoal.

Place pork on smoker. Be careful not to over-smoke. After 2 hours, baste pork with reserved marinade and return it to the smoker for 1 hour. Baste again and return to smoker for 1 more hour. Repeat 1 more time, with the basting and smoking for 1 more hour. Remove pork from smoker, wrap in aluminum foil and return to smoker until the pork has an internal temperature of 200 degrees F. (Alternatively, you can finish cooking the pork in a low oven preheated to 250 degrees F). When the pork has reached 200 degrees F, remove it from the heat and let stand for approximately 15 to 20 minutes before slicing or pulling.


This recipe was provided by a chef, restaurant or culinary professional. It has not been tested for home use.

Saturday, August 12, 2017

PANE BIANCO

Link to King Arthur Flour Recipe


DOUGH
3 cups King Arthur Unbleached Bread Flour*
2 teaspoons instant yeast
1 1/4 teaspoons salt
1 large egg
1/2 cup lukewarm milk
1/3 cup lukewarm water
3 tablespoons olive oil
*See "tips," below.

FILLING
3/4 cup shredded Italian-blend cheese or the cheese of your choice
1/2 cup oil-packed sun-dried tomatoes or your own oven-roasted tomatoes
3 to 6 cloves garlic, peeled and minced
1/3 cup chopped fresh basil, green or purple

Instructions
To make the dough: Combine all of the dough ingredients in a bowl (or the bucket of your bread machine), and mix and knead — by hand, using a mixer, or in your bread machine set on the dough cycle — to make a smooth, very soft dough. The dough should stick a bit to the bottom of the bowl if you're using a stand mixer.
Place the dough in a lightly greased bowl, cover, and let it rise for 45 to 60 minutes, or until it's doubled in size.
Meanwhile, thoroughly drain the tomatoes, patting them dry. Use kitchen shears to cut them into smaller bits.
Gently deflate the dough. Flatten and pat it into a 22" x 8 1/2" rectangle. Spread with the cheese, tomatoes, garlic, and basil.
Starting with one long edge, roll the dough into a log the long way. Pinch the edges to seal. Place the log seam-side down on a lightly greased or parchment-lined baking sheet.


Using kitchen shears, start 1/2" from one end and cut the log lengthwise down the center about 1" deep, to within 1/2" of the other end.
Keeping the cut side up, form an "S" shape. Tuck both ends under the center of the "S" to form a "figure 8;" pinch the ends together to seal.
Cover and let rise in a warm place until double, 45 to 60 minutes.
While the loaf is rising, preheat the oven to 350°F.
Uncover the bread, and bake it for 35 to 40 minutes, tenting it with foil after 20 to 25 minutes to prevent over-browning.
Remove the bread from the oven, and transfer it to a rack to cool. Enjoy warm or at room temperature. Store, well-wrapped, at room temperature for a couple of days; freeze for longer storage.

Tuesday, May 30, 2017

Damn Delicious Duck

This was a first for us, a new adventure in grilling.. A Damn Duck!
We pretty much followed the recipe below.  Due to the weather the duck sat for 48 hours in the brine.  Be sure to lightly rinse the duck before grilling, otherwise it may be too salty.  We also added hickory smoke for the last hour.  Like I said...Damn Delicious!


Rotisserie Duck with Honey Glaze and Drip Pan New Potatoes
Rotisserie duck, glazed with honey and lime, and served with potatoes cooked in the duck drippings.

Author: Mike Vrobel
Prep Time: 12 hours
Cook Time: 1 hour 30 minutes
Total Time: 13 hours 30 minutes
Yield: 2-4
Category: Rotisserie
Cuisine: American

Ingredients
6-pound duck
1 1/2 tablespoons Diamond Crystal kosher salt
A few thyme and rosemary sprigs, for stuffing the bird


Potatoes
1 1/2 pounds new potatoes, halved
2 teaspoons Kosher salt

Glaze
Juice of 1 lime (rind saved to stuff the bird)
3 tablespoons honey
1 teaspoon minced fresh thyme
1/2 teaspoon minced fresh rosemary
A few thyme and rosemary sprigs, tied together to make a brush

Instructions
Dry Brine the Duck: Slash the skin and fat all over the duck in a one inch diamond pattern, being careful not to cut into the flesh. Season the duck with the salt and pepper, inside and out. Rub the salt into the slashes in the skin. Put the duck on a rack over a roasting pan or baking sheet. Store in the refrigerator, uncovered, at least overnight, or up to 48 hours before cooking. This lets the skin dry, and gives the salt time to dry brine the duck.
Stuff, truss, and skewer the duck: Remove the duck from the refrigerator 2 hours before cooking to let it come to room temperature. Juice the lime and reserve the lime juice for the glaze, then put the lime halves and a handful of thyme and rosemary inside the duck cavity. Fold the wingtips back underneath the wings, then truss the duck. Skewer the duck on the rotisserie spit, securing it with the spit forks.


Prepare the grill: Set the grill up for rotisserie cooking at medium-high heat (400°F). For my Weber Summit, I remove the grill grates, turn the two outer burners (burners 1 and 6) to high, and turn the infrared burner to high. Then I put my drip pan in the middle, over the unlit burners, and let the grill preheat for ten to fifteen minutes. After preheating, I turn the lit burners down to medium-high.
Prep the potatoes: While the grill is pre-heating, halve the new potatoes, toss with 2 teaspoons kosher salt, put them in a microwave safe bowl, and seal the top of the bowl with plastic wrap. Microwave for 5 minutes to par-cook, and reserve for later


Prep the glaze: Put the reserved lime juice, honey, minced thyme, and rosemary in a microwave safe bowl and microwave for 1 minute. Stir until the honey and lime juice are evenly mixed.
Cook the duck and the potatoes: Put the spit on the grill, and cook the duck with the lid closed. After 45 minutes, pour the potatoes into the drip pan underneath the duck, and turn off the infrared rotisserie burner if the duck is browning well. The duck is fully cooked when the temperature in the thickest part of the thigh is 180°F; total cooking time is about an hour and a half. Once the duck is cooked through, brush it with an even layer of the glaze using the herb brush. Close the lid and cook for five more minutes to thicken the glaze, then brush the duck with another layer of glaze and remove from the grill.


Finish the duck and potatoes: Remove the duck from the spit, and transfer to a platter. Be careful – the spit is blazing hot. Remove the twine from the duck, then brush the duck once more with the glaze. Remove the potatoes from the drip pan with a slotted spoon, then taste and sprinkle with a little more salt if necessary. Let the duck rest for 10 minutes before carving.